March 20, 2015
Did you know that Instagram has more than 100 million users? That’s a lot of potential customers that you may not be speaking to about your products and services if you offer sublimated hard goods.
Think square products that typically are small in size and are created with a process like sublimation or another printing method that allows multiple colors. You may be wondering how you would incorporate an Instagram photo (or maybe you don’t use Instagram) and you need to create some samples to showcase this new option to your customers.
You’ve surely had those encounters in which customers bring you a low-resolution image off their phone and want to use it somehow to create a decorated product. Applying an Instagram filter is just one way to salvage that potential order loss. There are times when customers don’t have Instagram, but they love the unique look of an image that has had an Instagram filter applied to it. This is a way to get around those obstacles and turn their business into profits.
Applying some tricks through Adobe Photoshop can give images an Instagram feel in just a few steps and may earn you a new, repeat customer.
INSTAGRAM FILTERS
Instagram filters can make an ordinary (or less-than-ordinary) photo look closer to extraordinary. Using various color casts, adding vignettes and cropping images can change them enough for someone to love and want to use them. The most popular filters include Amaro, Mayfair and Earlybird. We’ll walk through how to create the Amaro style in just a few steps.
There are three Instagram tips you should keep in mind:
1. Instagram images are square.
2. When you include a vignette on the image, the edges of the photo should darken.
3. Round off the corners and use a white background to frame out the image — when applicable. (Some products have a radius corner and will do this job for you.)
GETTING STARTED — AMARO STYLE
Open your image file, check the size and confirm the resolution is set to 300 dpi. Let’s crop the image to be square and 4″ x 4″ in dimension. All Instagram images have a 1:1 ratio. Save the file with a different name than the original file.
Now, adjust the image’s brightness and contrast. From the top menu bar, select Image > Adjustments > Brightness/Contrast, then adjust the slider amounts to increase the brightness to 55-65, and change the contrast to a number between 10 and 15.
Amaro has a yellow tint to it, and that is the next step. Add a new layer in the Layers palette. This can be done in one of two ways. Click on the arrow at the top right side of the layers window and select “new layer,” or click on the icon at the bottom of the layer palette that notes New Layer when your mouse rolls over it. Fill this layer with a pale, creamy yellow (similar to: R:255, G:245, B:216) with the Paint Bucket tool.
Once you’ve filled this layer, change the mode setting at the top of the Layers palette from Normal to Multiply. You’ve now given the image a soft yellow tone.
Just a few more steps and your filter style will be done. In the Layers menu, ensure your photograph layer is selected for the next step. To adjust the Levels of the original image, select Image > Adjustments > Levels. In the Channel list, select Blue as the active channel to edit. At the bottom of this menu is a section labeled “Output Levels.” Change the left-hand number from 0 to 115. Keep the right-hand value at 255. This will give a blue tint to your image.
Now, to fade down the image some, remove a little bit of the contrast. Go to Image > Adjustments > Brightness/Contrast and move the slider for the Contrast amount to -10. By decreasing this value after the blue color adjustment has been done, it will alter the image in a different manner than if you were to not have adjusted the contrast at all in an earlier step.
As you can tell, adding yellows and blues and decreasing the contrast are the main ingredients of this filter. Next, adjust the Color Balance values. Image > Adjustments > Color Balance will bring up the new window. Be sure to click on the preview box before beginning work. In the bottom settings for the Tone Balance, select Midtones and check the Preserve Luminosity box. Move the slider to the right to increase the red, green and blue. Adjust the values to what looks good to your eye and aim for around 60-28-32 for the top Color Levels amounts.
Lastly, add the vignette effect by using a Layer filter. At the bottom of the Layer palette is an FX icon. Click on that icon to open a new window. From the styles on the left, choose Inner Shadow. I used black for the shadow color, changed the Blend Mode to Multiple and lowered the opacity to 63%. You may need to alter the angle of the shadow as well (the example here shows a 120-degree angle used). The distance is set to 13, Choke is 0 and the Pixel Size slider has been moved to 81 for the amount. No “noise” has been added, as that is not part of the Amaro look.
USING THE SHAPE TOOL
One of the common final touches on an Instagram filter is rounded corners. Using the Shape tool, drop down from the Shape menu and click on the Rounded Rectangle tool. The top menu bar options now change. On the far right is a pixel value amount. For the sample shown here, I used 100 pixels. Don’t forget to hold down the Shift key while drawing your shape to ensure it is square.
While there is no preview mode, you can input a value amount before you start dragging your square. Spend five minutes with this tool to better understand some of the options for drawing your square. My original value was 25, then 50, then 125.
The shape automatically is created on a separate layer (you want it to happen this way). Be sure to pull the square shape out as close to the edge of your image as possible when drawing it to include the vignette effect. To make the shape into a Layer Mask, hold down the Control key (Ctrl on a PC; Command on a Mac) and click on the image thumbnail of that layer. The square is now an active selection (it looks like ants are marching around the shape).
Next, click on your image layer, then the Layer Mask icon at the bottom of the Layers Palette menu (it’s the rectangle with a circle cut out). Now, turn off your square shape layer (click on the eye icon for that layer) to see your applied mask. The nice thing about the shape being on another layer is you always can go back and edit the shape to make it larger, smaller, etc., then reapply a new mask to your image layer. The Amaro filter for Instagram look is complete.
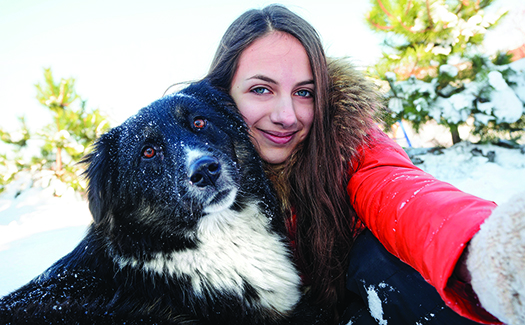
Now, our “selfie” example has a fun look without the low image quality meant for online sharing only. This effect can be applied to multiple products for fun photo gifts. Think small, square products: key chains, coasters, magnets, bag tags, phone cases and even smaller ChromaLuxe metal prints. Due to the color range, Instagram images easily can be created using sublimatable products.
Once you have products lined up, be sure to communicate to your customers. Notify them by showcasing product in your shop, on your website, by email and on any social media platforms (Facebook, Twitter or even Instagram). Get the images off the phone and into their hands, and be a photo gift hero.
Jennifer Foy is the creative director for Unisub and SwitchCase brands at Universal Woods Inc., a manufacturer of blanks for dye sublimation. For more information or to comment on this article, email Jennifer at jenniferf@unisub.com or visit unisub.com.
Suggested Reading
Like this article? Read these and other digital decorating articles at impressionsmag.com:
• “Would You Like a Plaque With That?”
• “DTG Vs. Dye Sublimation”
• “Extremely Intelligent Sublimation”
January 26, 2024 | Process + Techniques
So, your customer returned again this year asking you to reprint their usual spirit-wear design for the upcoming football game. That’s great. But why stop there? Think of all the potential that exists for increasing your sales by taking that one design and using it to create an entire collection.
FULL STORY
October 16, 2023 | Process + Techniques
Once you have chosen the type of emblem you want to use, you must decide which application method will be best.
FULL STORY
August 2, 2023 | Process + Techniques
Many apparel decorators have decided to diversify their businesses, and with newer technologies being simpler to adopt, there are now more shops with more decorating choices available than ever.
FULL STORY