July 13, 2015
My background is in halftone photography, and when I was using this old-school technology, it was imperative to have the proper light in the dark room where the film was handled.
It also was extremely important to have no unfiltered light entering the room either from cracks under the door, a vent or any other source. The film must be protected and inside its original box if ever the door was opened.
I’m not the know-it-all expert in screen making, but I have coated tens of thousands of screens, so I have a little experience. In light of the requirements when it comes to the screen room, it amazes me to see how forgiving many of today’s emulsions are when it comes to ambient light. That’s not to say they are immune from all light, but I’m amazed at what the common screen room can get away with.
In my perfect world, I would only use light that is filtered with a red filter — something like a Rubylith. There also are special bulbs that are made for film use. Why am I so paranoid, you ask? Well, if you’ve made as many screens as I have, in as many environments, you get a feel for how it can affect your screens and productivity.
If you have unfiltered or poorly filtered light in your screen-coating room, then a freshly coated-and-dried screen from this morning may work fine. But if that same screen were to sit on the shelf for a few days, you may find that you’ll have trouble getting the same printing results.
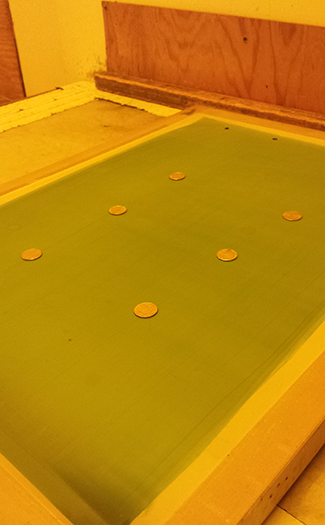
Here’s a simple test you can use to see if your screens are slowly getting exposed in your screen coating or coated screen-drying room:
1. Coat a 160 screen in the typical way. (I suggest two coats on the shirt side and two coats on the ink side.)
2. Dry the screen with the shirt side down horizontally.
3. Turn the screen upside down with the shirt side up.
4. Place six quarters separated by a few inches on the freshly coated-and-dried screen and leave them there for 24 hours. (You can substitute dimes or other coins instead of the quarters, just as long as they are opaque.) Ensure that you won’t have to move the screen for the duration of the test.
5. Remove one quarter, but take care not to move any others. Leave the screen in place for another 24 hours. Repeat this until all the quarters are gone.
6. When you have finished your test, go directly to the washout booth. Don’t expose the screen with any type of light. Now this is where you need to pay close attention: While you’re washing out the screen, it should all wash out at the same time. If you, in any way, can see where you placed the quarters, then the ambient light in your screen room is not correctly filtered.
The point of the experiment is to minimize one important controllable variable — one that is often overlooked or misunderstood, in my opinion — in the screen-making process. Inconsistencies in this process can be extremely frustrating, and can cost time and effort to fix.
Looking at your bottom line, that extra time and effort may result in a loss of money in the long run.
Kieth Stevens is the Western regional sales manager for International Coatings. He has been teaching screen printing for more than 10 years and is a regular contributor to International Coatings’ blogs. He also won a 2014 Golden Image Award from SGIA. For more information, visit iccink.com and read the company’s blog at internationalcoatingsblog.com.
March 20, 2024 | Production
As with pretty much any business, one of the keys for apparel and T-shirt decorators running a successful custom screen-printing shop is having the right equipment, first and foremost, the right press, or presses.
FULL STORY
March 15, 2024 | Production
As is the case with flash units and dryers, screen exposure units, computer-to-screen-systems and washout booths are critical to successful screen printing of T-shirts and other apparel
FULL STORY
January 16, 2024 | Production
Go to any industry trade show or visit an actual custom apparel screen-printing shop, and your eyes will naturally be drawn to the press, or presses there. This is true whether the shop in question employs a single manual press or is running multiple autos.
FULL STORY