August 27, 2013
Although the discipline is well over 1,900 years old, there still is no absolute or specific set of rules or guidelines to determine the best methods required to guide newcomers through the textile screen printing process. One mistake many industry newcomers make is failing to identify and establish the procedures needed to control the variables that can and do occur within the process.
In this installment, we will review the primary variables that require controlling or standardization in order to maximize the desired quality results to maintain your primary client base.
ARTWORK ENGINEERING
It’s important to remember that there is more than one way to do something. I visit far too many facilities where procedures are established and followed for one simple reason: “That’s the way it’s
always been done.” Such situations mandate thinking outside the box.
In relation to engineering the artwork for your screen printing job, you should consider the options that are available to make it easier to produce, while maintaining the design’s integrity. A majority of the designs on dark garments are printed with an underbase white and hit a second time with a highlight white to ensure the opacity of the white ink. In 90% of graphics printed onto a dark ground, this is the correct thing to do.
However, for the remaining 10%, and when thinking outside of the box, you should consider the colors within the graphic that could be used as an underbase as opposed to always using white ink.
One of the best colors to use for an
alternative underbase is gray. Typically, this color is a percentage of black and has the following advantages:
1. It is extremely opaque.
2.
The additional opacity allows for use of finer mesh counts and thinner ink film as a underbase.
3.
The thinner ink film and darker shade allow for faster flash times than when printing with white ink.
The only disadvantage is that you now need to use high-opacity colors to properly cover the darker shade of the underbase. This is not a problem for most screen printers, as we all use high-opacity inks on a daily basis anyway.
Another thought to consider when overprinting on an underbase is that when you can remove a screen from the wet-on-wet sequence of the post-flashed color, the printing process will become easier. The primary thought here is to use a color from the graphic, when possible, as the
underbase instead of adding to the process with multiple white inks. When white ink is required, you still can print it last through a 156 mesh onto the underbase.
In the same vein with the thought
of minimizing the number of screens
following the initial — or in this case, the last — flash in your sequence, one trick I have been fond of using on multicolored graphics is printing the black portion first in the sequence, followed by the underbase on darker or medium-shaded garments. As many graphics are separated as “butt-fit” registered colors anyway, there is little reason to run the black later in the sequence. Butt registering refers to the way ink colors meet without
overlapping or having any space between them. This also is referred to as butt fitting and “kiss registering.”
In this scenario, artwork permitting, you can run the black prior to the underbase and be done with it. Here again, removing any color from the back end of the sequence only simplifies the printing process.
PREREGISTRATION BASICS
I have seen preregistration systems incorporated into most shops with more than one automatic screen printing press. Most automatic press manufacturers
today have preregistration for their respective systems. Although they may vary in design, the goal is the same: to ensure your screens are photographed and registered into the press in as tight of a registration as possible. This minimizes the time required to register each film onto the screen and each screen into the press by hand.
There are two primary preregistration systems available today. The first and most widely used is the pin/punch registration. Different variations of this system exist, although they all achieve the same goal — minimizing setup time.
The second type of preregistration system is the computer-to-screen (CTS) system, where the screen in preregistered prior to being imaged in a CTS imaging system. This type of system also is called a direct-to-screen (DTS) system.
In the film system, pre-punched carrier sheets are used to allow you to align each film positive onto the carrier sheet while being aligned with a registration board. The initial carrier sheet is aligned onto the registration pins, which are attached to the registration board.
CTS PREREGISTRATION
Of the two types of preregistration
systems, CTS imaging is the quickest and easiest. The graphic to be printed is imaged directly onto the surface of the screen. Thus, the film process is eliminated altogether and you image the screen directly from a computer. This removes the entire process of punching, aligning and filing your films, as the images are all stored on the computer.
Once the screen has been imaged on the CTS imaging system, it can be set aside (within a light-safe environment) until you are ready to expose it. Another advantage CTS imaging offers is that it eliminates the glass/vacuum table from the exposure process.
There now are exposure units available that feature a retractable glass table, allowing for the exposure of CTS screens without the glass, or for the photography of screens using the film process. Most shops that have made the conversion to the CTS system also will keep their film process system in working order to use as a backup to the CTS system.
One of the primary aspects in streamlining your production process lies in engineering prepress procedures that will ensure minimal and accurate setup times from run to run.
Rick Davis is the southeastern regional sales manager for the Triangle Ink Co. He is a 35-year veteran of the textile screen printing and apparel manufacturing industries. His background includes plant design, management, troubleshooting, apparel manufacturing and consulting. He also is a member of the Academy of Screen Printing Technology. For more information or to comment on this article, email Rick at rdavis@triangleink.com.
Screen Coating and Exposure
Follow these tips for to optimize your screen coating and exposure procedures:
Keep it clean. The screen coating room should be as clean and particle-free as possible to reduce pinholes in the stencil after exposing. Some shops use Hepa Filters in this room to remove dust and particles from the air. The room also should be illuminated with yellow light for coating and storing screens.
Make moisture a minimum. Many shops use de-humidifiers to keep moisture levels low. Try hanging a hygrometer on the wall to check the relative humidity in the air. If you have high humidity levels, screens will never properly dry. Moisture trapped in emulsion is the No. 1 screen exposure problem.
The scoop. The most important tool in the coating room is the scoop coater. Remember to treat it with respect. There are two edges on the scoop coater from which to choose: one side is sharp for applying a fine layer of emulsion and the other is dull for applying a thick coating of emulsion on coarse meshes.
No white light. Instead of using halogen or “white light” to expose screens, use a metal halide point light source that outputs in the 420-nanometer range with a vacuum hold-down to keep the film positive firm against the emulsion during exposure.
— From the Impressions archives
Advantages of CTS
While it has many advantages, a computer-to-screen (CTS) system isn’t for every screen printing shop. Following is a list of areas in which CTS can be a benefit. However, we still encourage you to research the technology closely and examine your business model to make the best investment decision for your shop.
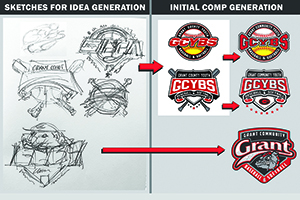
Art output and idle time. Artists have time to be creative and make images more production-friendly, rather than staring at an output device.
Cost savings. Switching to a CTS system means no more inkjet ink or film costs, and no time spent dealing with a carrier sheet-based preregistration system. You also realize time savings, as you don’t have to wait for inkjet film to dry. This means you can shave time off your screen making time. Greater productivity equals more money for employees and the shop overall.
Storage. There is no need to store films. Most printers have hallways, rooms or warehouses filled with rows of old films, often organized poorly and taking up valuable real estate. With CTS systems, you store digital files. Thus, storage becomes infinitely easier and more affordable, requiring only hard drive space and a good data backup regime.
Registration. A built-in pin registration system means that, depending on how your shop is set up, the art department can take care of registration. Without a CTS system, pin registration requires a punched sheet or carrier sheet, where you tape the film to the screen and registration is only as good as the person doing it. CTS holds very tight registration, which can lead to improved press setup times for staff members of all skill levels.
Faster screen exposure. Because of fewer steps in the process, screen exposure rates can be boosted. The chance of pinholes in screens due to dirt on the film or carrier sheet is drastically reduced.
— From the Impressions archives
April 5, 2024 | Process + Techniques
Why do we often struggle with some of the seemingly simplest things, like slathering screen-printing ink onto a decorated-apparel garment. Slathering so that it looks clean, bright, opaque and altogether attractive.
FULL STORY
March 13, 2024 | Process + Techniques
Wouldn’t it be wonderful if there was a secret formula for designing a best-selling T-shirt for a sports team, a business or for your own pre-print line?
FULL STORY
January 25, 2024 | Process + Techniques
As is the case with any craft, when it comes to screen-printing T-shirts and other apparel the devil is in the details. The best art, the best press in the world will inevitably come up short if you don’t take care of the little things as well.
FULL STORY